Using Age Banded Plans
Age Banded Plans allow benefit plan rates to be based on age ranges and additional factors such as gender or tobacco status. When a benefit plan is configured for age banding, you can create and maintain age bands and associated premium rates directly from the plan. This article details how to use age banded plans in ClientSpace.
Also see the video: Learning how: Age Banded Plans How-To Guide.
Making a Benefits Plan Age Banded and Creating an Age Band from a Benefit Plan on Group
Note: You can also add and maintain age bands from the Admin workspace. See Managing Age Bands from the Admin Workspace.
To Make a Benefits Plan Age Banded and Create the Associated Bands:
-
From the modules bar, click
 Workspaces.
The Workspace Search dashboard opens.
-
Select the desired Admin workspace or client workspace and click
 (Open).
The Workspace page opens. -
Move down the page to the administrative tiles where you see the dataform categories.

-
Enter "Benefits Plan" in the search for dataform field and then click the Benefits Plan tile.
The Benefits Plan dashboard displays.
-
Open the benefit plan you want to update.
-
Set Rate Group Type to Banded.
-
Click the Add
 option next to the Rate Groups link in the Action Center to add Rate Groups, if necessary, OR click the Rate Groups link to review any existing Rate Groups.
 Note: Once you set Rate Group Type to Banded on the plan, when you add a new rate group to this plan, the Rate Source field on the Rate Group Detail window will be automatically set to Banded.
-
If you are reviewing existing Rate Groups, ensure that the Rate Source is set to Banded.
-
When finished adding and/or reviewing Rate Groups, click Add
option next to the Banded link in the Action Center of either a Banded Rate Group OR the Banded plan to add an age band to the plan.Note: When adding an age band from the Rate Group, the badge counter is a count of bands associated with the displayed Rate Group. When adding the age band from the Benefits Plan, the counter is a count of all bands associated with the displayed plan.
Complete the following fields:
Field Description Plan Tier Required. The Plan Tier refers to the Rate Group tier. Select the Plan Tier if you are adding the age band record from the Benefits Plan record. If you are adding the age band record from a banded Rate Group record associated with the plan, it is automatically populated into the field for you.
The available Plan Tier values are auto-generate using an asterisk, followed by the Rate Group Title from the Rate Group record and the Carrier Plan Code from the Benefits Plan. EX: *New -051.
Benefits Plan Required. Auto-fills. The value is auto-generated using the Plan Title, Category, Effective Date and Carrier Plan Code from the Benefits Plan. EX: AetnaHealth - Health - 01/01/2026 (051). Band Type Add additional factors of gender and/or tobacco use. This is a multi-select field able to hold multiple values.
Band Type Description Female Age bands specific to female participants. Male Age bands specific to male participants. Tobacco Age bands for tobacco users. Non-Tobacco Age bands for non-tobacco users. From Age Required. Type the starting age for the band. To Age Required. Type the ending age for the band. Band Name
Required. Band Name is read-only and auto-generated using the Band Type selection and From Age/To Age range. EX: Female-Male-Tobbaco-18-30.
Note: Each Band Name must be unique within the benefit plan.
Premiums Enter the premium rate for each coverage level (i.e., EO Rate, ES Rate, EC Rate, EF Rate, EK Rate).
Note: Only Coverage Levels set to Yes in the "Prism Coverage Levels" section of the Benefits Plan record will display in the "Premiums" section of a related Banded record.
-
Coverage Level 1 = EO Rate (Employee Only Rate)
-
Coverage Level 2 = ES Rate (Employee + Spouse Rate)
-
Coverage Level 3 = EC Rate (Employee + Children Rate)
-
Coverage Level 4 = EF Rate (Employee + Family Rate)
-
Coverage Level 5 = EK Rate (Employee + Domestic Partner Rate)
Note: An Import ID is auto-generated using the Carrier Plan Code and Effective Date from the Benefits Plan record, Rate Group Title from Rate Group record, the Band Type Codes (such as F for Female and NT for Non-Tobacco) and the From Age/To Age range. EX: 001-20250101-New-F-NT-18-30
-
-
What do you want to do?
-
Click Apply to save your changes and stay on the current form.
-
Click Save & New to save your changes and open a new blank form to add the next band.
-
Click Save to save your change and close the current form.
-
Managing Age Bands from the Admin Workspace
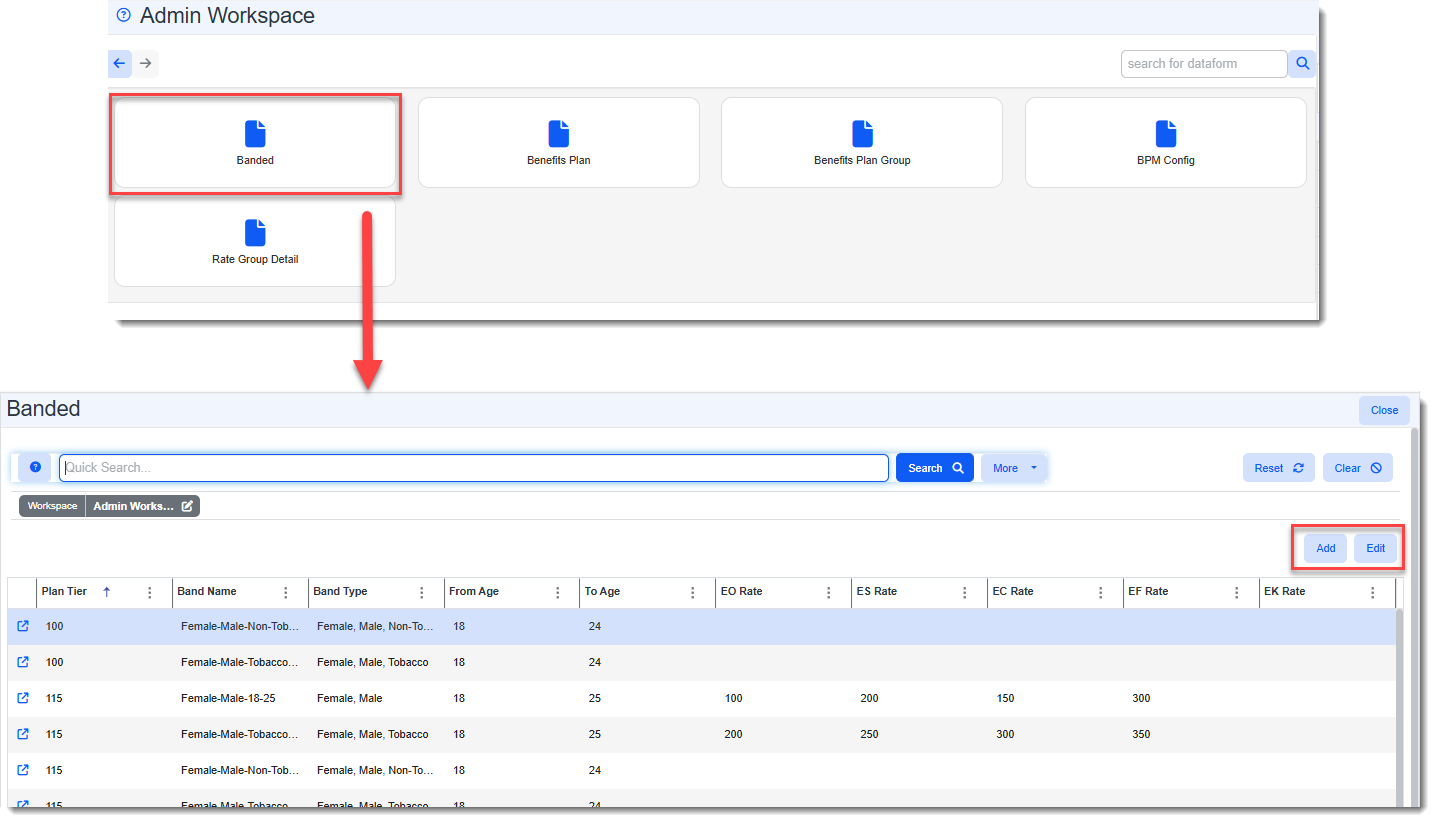
You can also Add or view and Edit age bands from the Admin workspace by accessing the Bands dashboard.
To access the Bands Dashboard from the Admin Workspace:
-
From the modules bar, click
Workspaces.The Workspace Search dashboard opens.
-
Select the Admin workspace and click
(Open).
The Admin Workspace page opens. -
Move down the page to the administrative tiles where you see the dataform categories.
-
Click the Benefits tile and then search for "Banded" in the search for dataform field.
The Banded dashboard displays where you can Add or view and Edit age bands.