This topic discusses features that allow you to personalize your user profile. In addition to the basic demographic data, you can customize the profile so that the application functions the way you like. Let's look beyond the basic demographic information in the General area and focus on Workspace Search, Time Zone, External Calendar URL, and Out of Office fields.
To personalize your user profile:
-
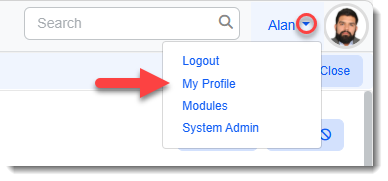
On the ClientSpace menu bar, click the down arrow next to your username and select My Profile.
The User Details form opens.

-
Complete the form.
Note: Some of these fields/modules may not be available for external users.
|
Action Center: |
|
|
|
|
Modules |
You can add modules to your modules bar to provide enhanced functionality and navigation. You can also manage the order of modules that display in the modules bar. See User Modules. |
|
|
Workspace Search |
If your Home page contains the Workspace widget, you can set the default to Favorites or Recent Workspaces. |
|
User Settings: |
|
|
|
|
Enable Email for this account |
Default is enabled. Enables email notifications to external email, such as Gmail or Outlook. Note: Keep in mind that if you disable this option and your email is used on a ClientSpace email template as an ad-hoc email recipient, you will not receive the email. |
|
|
Load Home Page by Default | Default is enabled (selected). |
|
|
Adjust for DLS | Automatically adjusts your calendar events to take daylight savings (DLS) time into account when setting the event time. |
|
|
Disable Original Value Popup |
Displays only when "Revert to Original Value" functionality (that allows you to restore a previous value in an editable field by displaying a popup containing the original value) is enabled at the system level. Clicking the checkbox disables "Revert to Original Value" functionality at the user level. |
|
|
Time Zone | Select a time zone. Default is Eastern Standard Time. |
|
Upload Email Attachments |
Default is Yes.
Determines if attachments can be uploaded when attaching Activities from the
Email Add-In. |
|
|
|
External Calendar URL |
Can be set to use the ICS file location for an external calendar such as Exchange and Gmail. This exposes external calendar events on the ClientSpace calendar which allows you to combine your external calendar with your internal system calendar. You provide the URL to a shared calendar in this field. The external calendar events display as green and are not editable. After you enter an external calendar URL in this field, you can click the Sync button See Adding external calendar events for more information about selecting a calendar. |
|
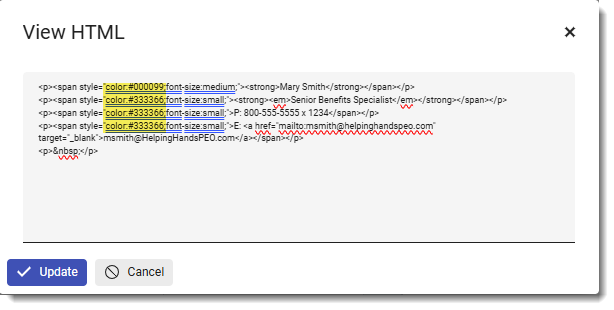
Signature |
Adds a custom signature message to Email Activities. Use the rich text editor toolbar to make customizations according to your branding specifications:
Tips:
Note: You can use the View HTML option to make other changes and apply other custom effects that are not available on the toolbar.
|
|
|
Out of Office: |
|
|
|
|
Enable Out of Office |
When you enable this option, you can:
|
|
Administrator Settings: Note: Only Global Admin users can maintain the Administrator Settings. |
|
|
|
|
|
|
|
Global Admin |
Select to establish the user with admin rights to ClientSpace. |
|
|
Password Never Expires |
Select this option to indicate that your Global Admin user password never expires. If you select this option, the system disregards the Password Reset password settings. If you do not select this option, the system uses the value in the Password Reset password settings to determine when your user password expires. See Configuring your ClientSpace authentication settings. |
|
|
Change Password Next Login |
Select this option to require the user to change their password on the next login. |
|
|
|
Can Create Workspaces |
Select this option to allow the user to create workspaces. |
|
Send Escalation Email |
Enables users to select whether to receive escalation notices for tasks in the system. |
|
|
Send Account Info Email |
When this field is selected, the user receives an email with their username and login instructions. |
|
|
User Type |
Auto-filled when using a Template User. |
|
|
Default Workspace |
Available when User Type = External. Determines the workspace an external user will be directed to after logging in. |
|
|
Date to Expire |
Set a date to expire the user account. |
|
|
|
Authentication Type |
Auto-filled when using a Template User. |
|
|
Domain |
This field is available when Authentication Type = Active Directory. Select an Active Directory Domain for this user. |
|
|
Reporting Profile |
Auto-filled when using a Template User. Used for Business Intelligence reports. See Configuring Security in Business Intelligence Reporting. |
|
|
Notes |
Auto-filled when using a Template User. |
|
Personalization: |
|
|
|
|
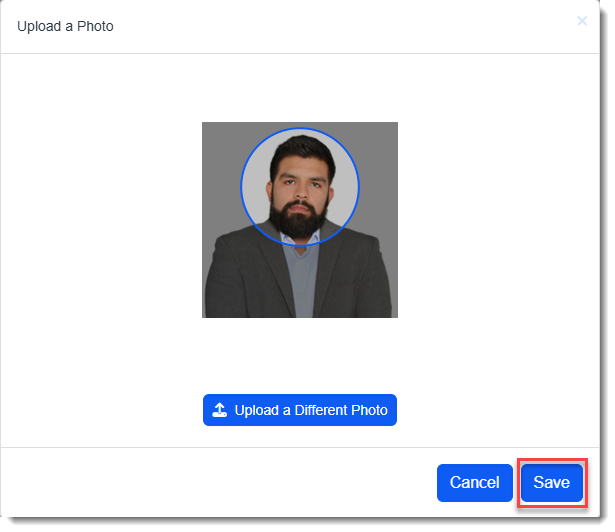
Photo |
If your Global Administrator has configured a setting to allow profile pictures, the Personalization fieldset is displayed. Global Administrators can add profile pictures.
Upload a profile picture in the Photo field by clicking the Upload New Photo
Profile pictures display next to the username in the upper right corner of the ClientSpace menu bar as shown in the example below:
Profile pictures also display when you click a User Information
Additional maintenance options:
|


Watch the video about "Out of Office" Notifications and Other User Profile Personalization Settings.