Creating and Using Surveys on Email Templates
Overview
This topic provides ClientSpace System Administrators with step-by-step instructions for designing a survey and configuring a survey email template that you can trigger from a dataform such as a Client Service Case.
With minimal effort, you can easily create one or more custom survey designs.
You can:
-
Add a primary question and up to 19 additional questions.
-
Display a comments section with text to guide respondent feedback.
-
Use a rating scale we created or create your own rating scale.
-
Customize a rating scale's appearance. For instance, you can change the Decode value (i.e., the scale's label text or numerals that your respondents see) or show the selections as a star rating, in a drop-down selector, as radio buttons or as text buttons.
-
Set a color scheme.
-
Add a logo.
-
Create multiple (unlimited) survey designs to choose from for specific purposes.
Once a survey design is created, you can attach it to your survey email template configuration (as detailed in the Configuring a Dataform Survey Email Template section of this article.)
The use case demonstrated in this topic triggers a survey when a Client Service Case is resolved. You can adjust the configuration as needed for your own use case(s).
Completed primary question survey results are stored in the Survey Results dataform table (gen_csSurveyResults). The Survey Question Answers dataform table (gen_csSurveyQuestionAnswers) holds answers to any questions added to the "Additional Questions" section.
Use the dataform tables to create your own reports showing survey statistics. Or, for an "on-the-fly" analysis of a specific survey to determine why an exceptionally high or low rating was given, you can click Open Related Form on the Survey Results form to quickly access the related case and review case notes (as detailed in the Working With Survey Results section of this article.)
Note: Contact Professional Services if you require additional assistance configuring or using this feature.
Reviewing Pre-Configured Rating Scales
The following survey rating scale lookups have been set up for you:
|
1 - 10 |
This is the default 10-point rating scale. |
|
Frequency |
5-point rating scale. Valid default options are Always, Often, Usually, Sometimes and Never. |
|
Agree |
5-point rating scale. Valid default options are Highly Agree, Agree, Neutral, Disagree, and Highly Disagree. |
|
YesNo |
Valid default options are Yes or No. |
You have three options for determining the rating scale used in your design:
-
Select one of the pre-configured options above.
-
Create your own rating scale.
Review the steps below to edit decode values for an existing rating scale or create a new rating scale.
Editing a Pre-Configured Rating Scale
You can edit a pre-configured rating scale by changing the Decode value on the scale. The Decode value is what your survey respondents see. For instance, if you want to use the 1 - 10 rating scale but you want survey takers to see a range from Poor to Exceptional (with 1 being Very Poor and 10 being Exceptional), change the Decode values from numbers 1 - 10 to text values instead.
To edit a pre-configured rating scale:
-
Open the Lookups dashboard (System Admin
 > Lookups) and search for Survey Rating.
 -
Display the Filter column by clicking the vertical three dot menu (i.e., Kebab menu)
 on any column header, selecting Columns and then selecting Filter.
Note:
-
All survey ratings must be in the Survey Rating lookup group. Filter is used to group survey ratings and establish filtered subsets to use on surveys. The filter determines which items in the Survey Rating lookup group belong together in the same rating scale.
-
A lookup item can belong to more than one filter. Multiple filters appear as comma-separated values in the Filter column as shown in the image above. The values are set in the Filter field of the Lookup details record.
-
-
Note the Filter value to make sure you are editing a rating in the correct rating scale and click
 (Open) next to a Survey Rating record.
 -
To change a decode value, enter a new value to display to survey respondents in the Decode field. Example: On the 1-10 point rating scale using Survey Rating records, replace the "10" in the Decode field with "Exceptional".

-
Click Save.
-
Repeat steps 2 through 5 on each Survey Rating record in the rating scale until all Decode field values are changed to the desired values.
Create a New Survey Rating Scale
To create a new survey rating scale:
The steps to create the new rating scale involve adding new values to the existing Survey Rating lookup group. This is the same process used to create any lookup values in our system. For detailed steps, please refer to the Add Values to the Lookup Group section of the Configuring Lookups topic.
However, in addition to following the general steps to add values to the Survey Rating lookup group, there are a couple of things related to survey rating scale creation that you should note:
-
The Filter value must match if the ratings belong in the same scale! Ensuring that the Filter field has the same value for all items belonging to the same rating scale is imperative.
Even the slightest misspelling, extra space or stray punctuation mark on one of your rating scale entries will cause that item to not be grouped with the rest of the rating scale items.
Tip: You can copy and paste a Filter value from one Survey Rating Lookup Details record to another to ensure no mistyping.
-
A lookup value can be used in more than one filter! This allows you to create unlimited subsets. In the example below, we have created filters named 1-10, 1-5, and 1-7. We want the lookup value "1" to be included as a rating value in the 1-10, 1-5 and 1-7 filter groups so we added them all to the Filter field separated by commas):

Note: You can view all of the rating scales a lookup value belongs to when you display the Filter column on the Lookups dashboard (System Admin
 > Lookups) by clicking the vertical three dot menu (i.e., Kebab menu) on any column header, selecting Columns and then selecting Filter:
-
Mind the Display Order! The order in which the rating scale displays to users is dependent on the Display Order. Lower numbers display first. Higher numbers display last. For example, if you want the most positive rating to display first, incrementally assign a Display Order where the lowest number represents the most positive rating. Following this logic, you can define a Display Order as follows:
Rating
Display Order
Very Likely
1
Likely
2
Neutral
3
Unlikely
4
Very Unlikely
5
Note: You do not have to use consecutive numbers from 1 to 5 as we did in the example. The numbers just need to reflect a progression from lowest to highest (or highest to lowest, depending on the order in which you want the items to display.) For example, you could have used 10, 20, 30, 40, and 50 instead of 1 through 5.
Creating a Survey Design
In this step, you enter your survey questions and establish the "look and feel" of your survey.
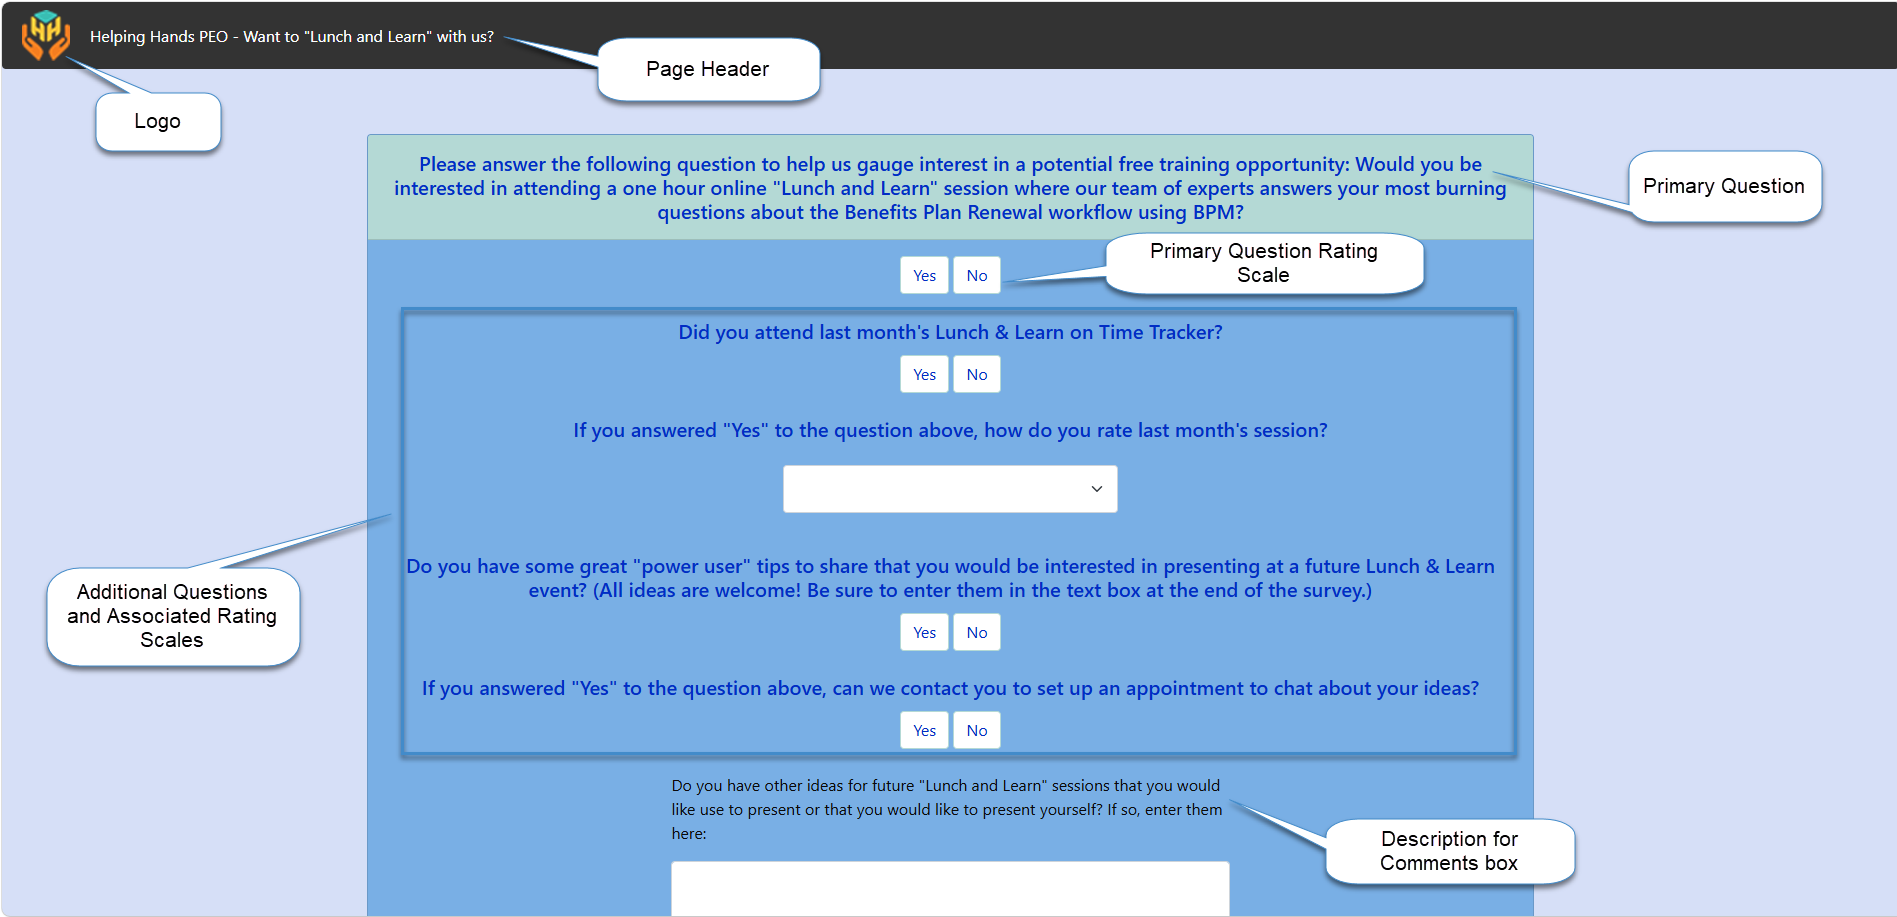
To create a survey design:
-
Open the Survey Design form (System Admin
> Email Templates> Survey Design).The Survey Design dashboard displays.
-
Click Add.
The New Survey Design form displays.
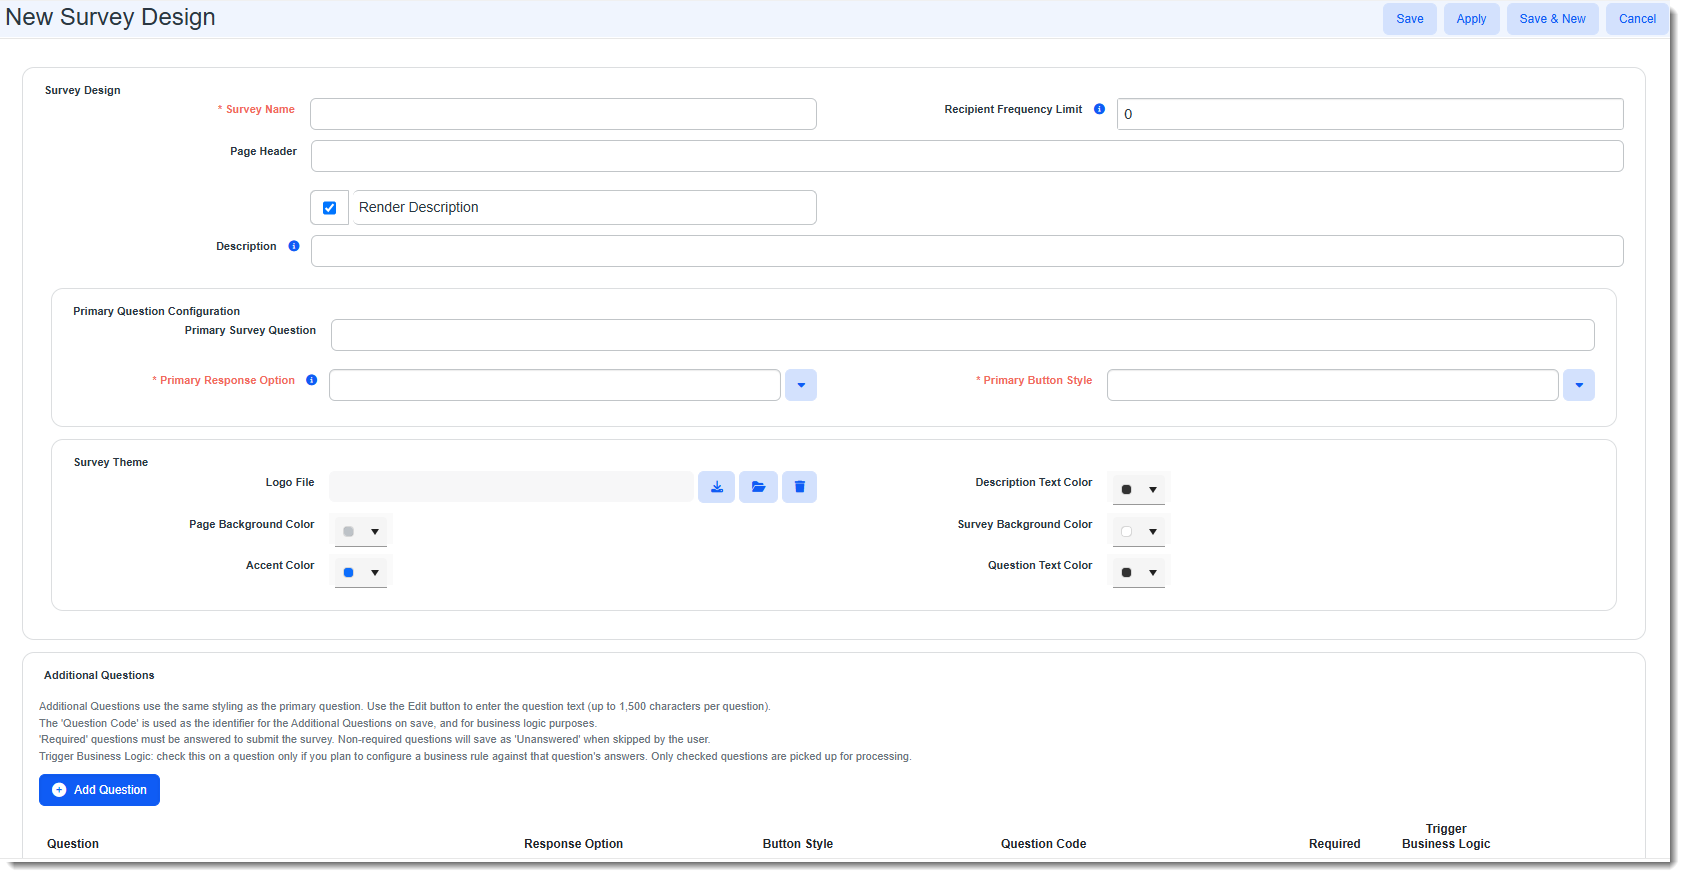
-
Complete the fields in the Survey Design section as applicable:
Survey Name Required field. Enter a name for your design. This is the name the survey is listed by on the Survey Design dashboard. The name must be unique and is validated against other survey names to ensure uniqueness.
Examples:
-
Customer Recommendation
-
Lunch and Learn
Tip:When you open an existing survey and it is added as a Work Center item, it displays as {Survey Name} Survey Design. Therefore, if you include the word "Survey" in the name, the Work Center link includes the word survey twice.
Example: Customer Recommendation Survey Survey Design. If the repetition bothers you, avoid using the word "Survey" in the Survey Name.
Recipient Frequency Limit
The value in the field defaults to 0 and represents the number of days between the date the survey was last sent and the current date that must pass before the survey can be sent to a recipient again.
When the value is blank or 0, any email survey template configured with the survey design can be sent to recipients each time the email template conditions are met.
When the value is a number > 0, ClientSpace will evaluate the Recipient Frequency Limit and compare it to the DateLastSent stored in the Unsubscribe By Design table. If the number of days since the survey was last sent exceeds the set limit, the survey will be sent if there are no other settings restricting the survey from being sent, such as "unsubscribe" or email template conditions.
Note:
-
The DateLastSent in the Unsubscribe By Design table is updated to the current date each time a survey of that type (i.e., survey design) is sent for a user.
-
This functionality respects "unsubscribe" functionality and any other email template configuration such as the Only Trigger Once setting in the Email Template configuration.
Page Header Enter a page header. It displays in the upper left corner of the survey form. If empty, no value is displayed.
Examples:
-
Helping Hands PEO - Customer Satisfaction Survey
-
Helping Hands PEO - Want to "Lunch and Learn" with us?
Survey Reminder
Set offset days in the Survey Reminder field before a reminder notification encouraging the survey recipient to complete the survey is sent. After the specified number of days passes, the Survey Reminder email template that you create triggers the notification.
Note:
-
You must create your own email template, separate from the original survey template, with a Type on Step 1: Initial of Survey Reminder and also configure the template to trigger from the Survey Reminder field on the Survey Design. See Email Templates: Basic Configuration.
-
The reminder is skipped if the recipient unsubscribes from this or all surveys or if they have already completed the survey.
Render Description
Checked by default. When checked, an Additional Comments text box displays at the bottom of the survey.
Note: In the "Additional Questions" section, there is a Text Response option in the Response Option drop-down field that allows you to capture text answers to an individual question.
Anonymous Survey
When selected, the following actions are taken on survey results to ensure respondent privacy:
-
Survey results are recorded as "Anonymous" in the Completed By field.
-
Links to the triggering form for the survey results are hidden in the ClientSpace user interface.
-
The entity row GUID of the triggering form for the survey results is removed from the Survey Results table.
Note: The Anonymous Survey setting cannot be changed after the initial save of a survey design. Accordingly, the setting cannot be applied to pre-existing survey designs since these are saved designs.
Description Enter some leading text to display above the Additional Comments text box. The Description text displays in a smaller font than the survey question font above the Additional Comments text box. This text guides the respondent to provide the feedback you seek. If the field is empty and the Render Description checkbox is checked, the default Description text is displayed as "Additional Comments".
Examples:
-
In a few sentences, tell us why you would or would not recommend us.
-
Do you have other ideas for future “Lunch and Learn” sessions. If so, enter them here.
-
-
Complete the fields in the Primary Question Configuration section as applicable:
Primary Survey Question
The Primary Survey Question displays first in the list of survey questions and is typically used to set the tone of the entire survey. The Accent Color from the "Survey Theme" section is used as the background color.
Examples:
-
Based on your most recent experience, how likely are you to recommend us to another organization?
-
Please answer the following question to help us gauge interest in a potential free training opportunity: Would you be interested in attending a one hour online "Lunch and Learn" session where our team of experts answers your most burning questions about the Benefits Plan Renewal workflow using BPM?
Primary Response Option
Required field. Select the rating scale you want to use for the Primary Survey Question. Select a pre-configured option or a custom rating scale that you created from the drop down list.
Primary Button Style
Required field. Select rating scale format. Valid options include: Radio Buttons, Text Buttons, Stars, and Dropdown.
-
-
Complete the fields in the Survey Theme section as applicable:
Logo File
Select your logo file.
Note: You must resize your logo file to the proper display size before uploading the file.
-
Click
 (Upload File).
The Upload File dialog box opens. -
Click Choose File.
-
Locate the file on your computer and click Open.
The file name displays. -
Optional: For Description, type a description of the uploaded file.
-
Optional: For Category, select an entry from the list.
-
Click Save.
Page Background Color
This color displays as the background of the entire survey page (i.e, the area behind the survey box.) Click the down arrow to select a color and then click Update to apply the selection.
Note: For all fields with a color selection option, you can:
-
Create a custom color: In Gradient View
 drag the selector along the vertical color bar and then drag the selector in the color gradient box to create a custom color.
 -
Use your branding colors: In Gradient View
, type a hex color code representing a branding color in the HEX field. -
Select from a defined palette: In Palette View
 select a color from the limited palette of colors shown.
Survey Background
This color displays as the background of the part of the survey box where the Additional Questions and Comments box are displayed. Click the down arrow to select a color and then click Update to apply the selection.
Accent Color
This color is used as the background color of the Primary Survey Question and the Submit button. Click the down arrow to select a color and then click Update to apply the selection.
Description Text Color
Sets the color of the survey description text for the Comments box.
Question Text Color
Sets the color or the survey question text, Rating Scale text and Submit button text.
-
-
To add an additional question, click Add Question in the "Additional Questions" section and then complete the fields in the grid as applicable:
Question
Click Edit
 . The "Additional Question Text" popup window displays. Type the question text and click Save.
Response Option You can either select the rating scale you want to use for the question (from a list of pre-configured option and any custom rating scales that you created) OR you can select Text Response to insert a Comments box under the question.
Note: If you select Text Response, the Button Style field on that row becomes inaccessible or "grayed out".
Button Style Select the rating scale format for the Additional Question. Valid options include: Radio Buttons, Text Buttons, Stars, and Dropdown. Question Code Question Code is a short identifier used for business logic purposes, such as report building or rules triggering.
Required
Click Required to require the survey recipient to answer the question before they can submit the survey. Required questions are indicated by a red star on the survey. Non-required questions will save as "Unanswered" when skipped by the user.
Trigger Business Logic
Click the checkbox if you want this question to be available for business rule configuration. Only checked questions are picked up for processing by business rules by the scheduled process named Trigger Survey Question Answers Business Logic .
IMPORTANT: If you want to create business rules using questions that trigger business logic, you must always set the Primary Trigger Field on the business rule configuration to BizLogic Triggered (chkBizLogicTriggered). If you do not do this, the business rule will never trigger as the Primary Trigger Field will never be evaluated.
-
Repeat step 6 to enter up to 19 additional questions.
-
Optionally, reorder questions in the grid by dragging them and dropping them into place.
-
Click Apply and then click Preview Survey Design.
A mockup of your design displays on a separate tab of your browser.
-
Make any changes as necessary to your design and then click Save to save any changes to the survey design.
Configuring a Dataform Survey Email Template
The following procedure guides you through the steps to configure an email template that triggers when a case is resolved. Other use cases may be applicable.
To configure a case survey email template in ClientSpace:
| 1. | Go to System Admin > Email Templates. |
The Email Templates dashboard opens.
| 2. | Click Add. The Choose Email Template Type window displays. |
| 3. | Select Real Time or Scheduled. |
The Email Template wizard opens at Step 1 Initial.
Note: If you are configuring a scheduled survey, also see Configuring Scheduled Email Templates.
| 4. | Complete Step 1 Initial. |
|
Type |
Select Survey. |
|
Triggering Form |
Select Client Service Case. |
| Template Code | Add a short descriptive code to identify this template, such as CaseSurvey. |
| Template Name | Add a descriptive name (this is displayed in the application list), such as Customer Satisfaction Case Survey. |
| Description | Include a brief description, such as Customer Satisfaction Case Survey - Triggers after case resolution. |
| Execute On |
Select Insert or Update. Note: This setting is displayed for Real Time email templates only. It is not applicable for scheduled email templates. Also see Configuring Scheduled Email Templates. |
| Merge Procedure | Leave blank. |
| Execution Pipeline | Leave set to Default. |
|
Workspace Templates |
Select the Workspace Templates that will receive this email. Default is All Templates. |

Note: If configuring a Scheduled Email Template, also refer to Configuring Scheduled Email Templates for Scheduled Email Action definitions.
| 5. | Click Next and complete Step 2 Content. |
|
Subject |
The subject line of the email that is generated. The email recipients see this subject. |
|
Body |
The body of the email that is generated. This field supports rich text, so the email may be branded and include links. This is seen by the email recipients. You can use replacement fields to customize the message. To use replacement fields, click See Replace Fields. For details about replacement fields, see Replacement Fields.
Important: The {SurveyURL} Replace Field located in the Survey section of the Replace Fields window is required. Use it to insert the survey link into the body of the email.
To configure the link without showing the actual URL in the email:
|
|
Survey Design |
Required field. Note the presence of the Open
Click the button to open your survey design, review the design or make and save desired changes. When you are finished making changes, use the work item link on the left pane to return to the Email Template. |


 button next to your selection.

| 6. | Click Next and complete Step 3 Addresses. |
| Address Stored Procedure |
Optionally, select an Address Source Procedure if you want to send the survey to a list of recipients other than the recipients on the triggering form. |
| From Address |
This field defaults to Admin Email Address (the application administrator's email address). This is the default admin email set in System Admin To change this setting:
|
 >
> | 7. | To add recipients, click Add. |
A row opens. This is where you specify an email source.
| Source |
Select the Email Address Source. The drop down list contains multiple valid options for Source such as Current User and other dataforms.
In the example, we are selecting Client Service Case so that we can pick an email address field on the case record to use in the Address field. We are also selecting Adhoc Email Address which allows us to manually type a specific address in the Address field. Note: If you are configuring a scheduled email template, Current User is not available as an option in the Source field. This option only works with Real Time field analysis to determine a current user. Also see Configuring Scheduled Email Templates. |
| Type |
Type must be To for surveys. Note: CC is not an available option as each recipient receives their own unique email and survey. The {SurveyURL} replace field is unique per recipient. |
| Address |
Depending on your Source selection, you can:
In our example, we are specifying the Email Address field from the Client Service Case and we have also entered an Adhoc Email Address to receive the survey when the email template triggers. |

| 8. | Click Next and complete Step 4 Conditions. |
| No Primary Trigger |
For Real Time email templates:
For Scheduled email templates: This field is not displayed. This option only works with Real Time field analysis. Also see Configuring Scheduled Email Templates. |
| Primary Trigger Field |
For Real Time email templates: If a Primary Trigger Field is selected, the value in the selected field must change values to trigger the template. Then, Additional Conditions (located under Add ) will be evaluated using an implied AND to connect the Primary Trigger Field to any Additional Conditions entered. If there are no Condition Expression entries entered to override the default "OR" behavior, additional conditions are evaluated using an implied "OR". Example: Primary Trigger Field AND (Condition1 OR Condition2 OR Condition3). For Scheduled email templates: This field is not displayed. This option only works with Real Time field analysis. Also see Configuring Scheduled Email Templates. |
|
Only Trigger Once |
By default, a survey email template triggers each time the configured conditions on the triggering dataform are met. This means that the same email recipient can receive the survey again if the conditions on the dataform are met to trigger the survey. If you want the email template to only trigger the first time the conditions are met, select this option. |
|
Condition Expression |
Allows for AND, OR, and NOT conditions using the display conditions (Label) from the Additional Conditions section (located under Add ). Using the Label field that corresponds to the entries in the Add section, you can combine the conditions into more complex expressions. The Condition Expression field could state, for example (C1 AND C2) OR (C3 AND C4) OR C5. This level of complexity was not required for our example. For a detailed explanation about conditions, see Condition expressions. |
| 9. | To configure Additional Conditions, click Add. |
A row opens for adding conditions to include Source, Field, Operator, Value, and Label. You can add multiple conditions.
| Source | Indicates the dataform or stored procedure that provides the triggering condition. For our example, we selected Client Service Case. |
|
Field |
This is the field that is evaluated for the conditions. For our example, we selected Resolution. |
|
Operator |
The type of comparison between Field and Value. For our example, we selected Equals. For scheduled email templates: The Is Dirty trigger Operator is not available when setting Additional Conditions. This option only works with Real Time field analysis to determine if a field has changed. |
|
Value |
The criteria against which Field is compared. For our example, we selected Complete. |
|
Label |
The label to be used when constructing Condition Expressions for triggering. Labels are used in the Condition Expression field. For our example, we accepted the default of C1. |

| 10. | Click Next. |
| 11. | Step 5 Attachments is used to include an attached file with the email template. In our example, we skipped Step 5 Attachments. However, you could use this to send a document that includes any details that were not included in the body text, such as a PDF of a privacy notice detailing how the results will be used. |
| 12. | Click Finish to save your work. |
After you click Finish, a "Would you like to publish?" confirmation message displays. This email template does not work just yet because it is unpublished (inactive). You must publish the new email template to make it active.
If you are ready to publish immediately:
- Click Yes on the confirmation message.
The email template is now published.
If you would like to publish later:
- Navigate to the Email Template dashboard.
- Locate your survey and click the Published checkbox.
The email template is now unpublished.
Working With Survey Results
There are multiple ways to work with survey results:
Build Reports Using Results Tables
-
Use the Survey Results dataform table (gen_csSurveyResults), Survey Question Answers dataform tables (gen_csSurveyQuestionAnswers) and survey metadata to build reports.
-
The Survey Results dataform table (gen_csSurveyResults) holds answers to the Primary Survey Question and any comments that were entered.
-
The Survey Question Answers dataform table (gen_csSurveyQuestionAnswers) holds answers to any questions added to the "Additional Questions" section of the survey design.
If you want to create calculations (such as averages) of survey results, select the dataform table, the SurveyRating lookup value and METADATA - Survey Data Sources as shown in the example below:

Specify fields to display on the report as you would for any BI report:

Also specify filters such as SurveyRating = Isn't Blank and if using the METADATA - Survey datasource, specify the ID of the Survey Rating lookup group under Value(s):

Global Admins can get the ID from the Survey Rating Lookup Group Details window (System Admin
> Lookups > Manage Groups) in the Administrative section.Note: The METADATA - Survey table contains the integer equivalents of the survey ratings which allows you to use the results in calculations on Reports. Note that these equivalents are set up for you on all pre-configured survey rating lookups listed below:
1 - 10
10-point rating scale used for the default survey layout. Valid default options range from 1 to 10 ( with 1 = Very Poor and 10 = Excellent). Default integer equivalents are also 1 to 10.
Frequency
5-point rating scale. Valid default options are Always (10), Often (7), Usually (5), Sometimes (2)and Never (0). Default integer equivalents are shown in parentheses.
Agree
5-point rating scale. Valid default options are Highly Agree (10), Agree (8), Neutral (5) , Disagree (2), and Highly Disagree (0). Default integer equivalents are shown in parentheses.
YesNo
Valid default options are Yes (10) or No (0). Default integer equivalents are shown in parentheses.
If you have custom survey rating lookup values that you added on your own, the integer equivalent values must be manually entered on the Lookup Details dataform:

For detailed steps, please refer to the Add Values to the Lookup Group section of the Configuring Lookups topic.
View the Survey Results and Additional Questions Dataform
The second method of working with survey results is by clicking the Survey Results link to the Survey Results dataform. (If a Global Admin has created a link to the Survey Results dataform from your workspaces, you can click Survey Results in the Action Center under Links to view a list of all Survey Results dataforms for the workspace.)
The Survey Results dataform holds answers to the Primary Survey Question and any comments that were entered. The Survey Question Answers dataform is a child dataform linked to the Survey Results dataform which holds answers to any questions added to the "Additional Questions" section of the survey design. Click the Additional Questions link in the Action Center of the Survey Results dataform to access it.
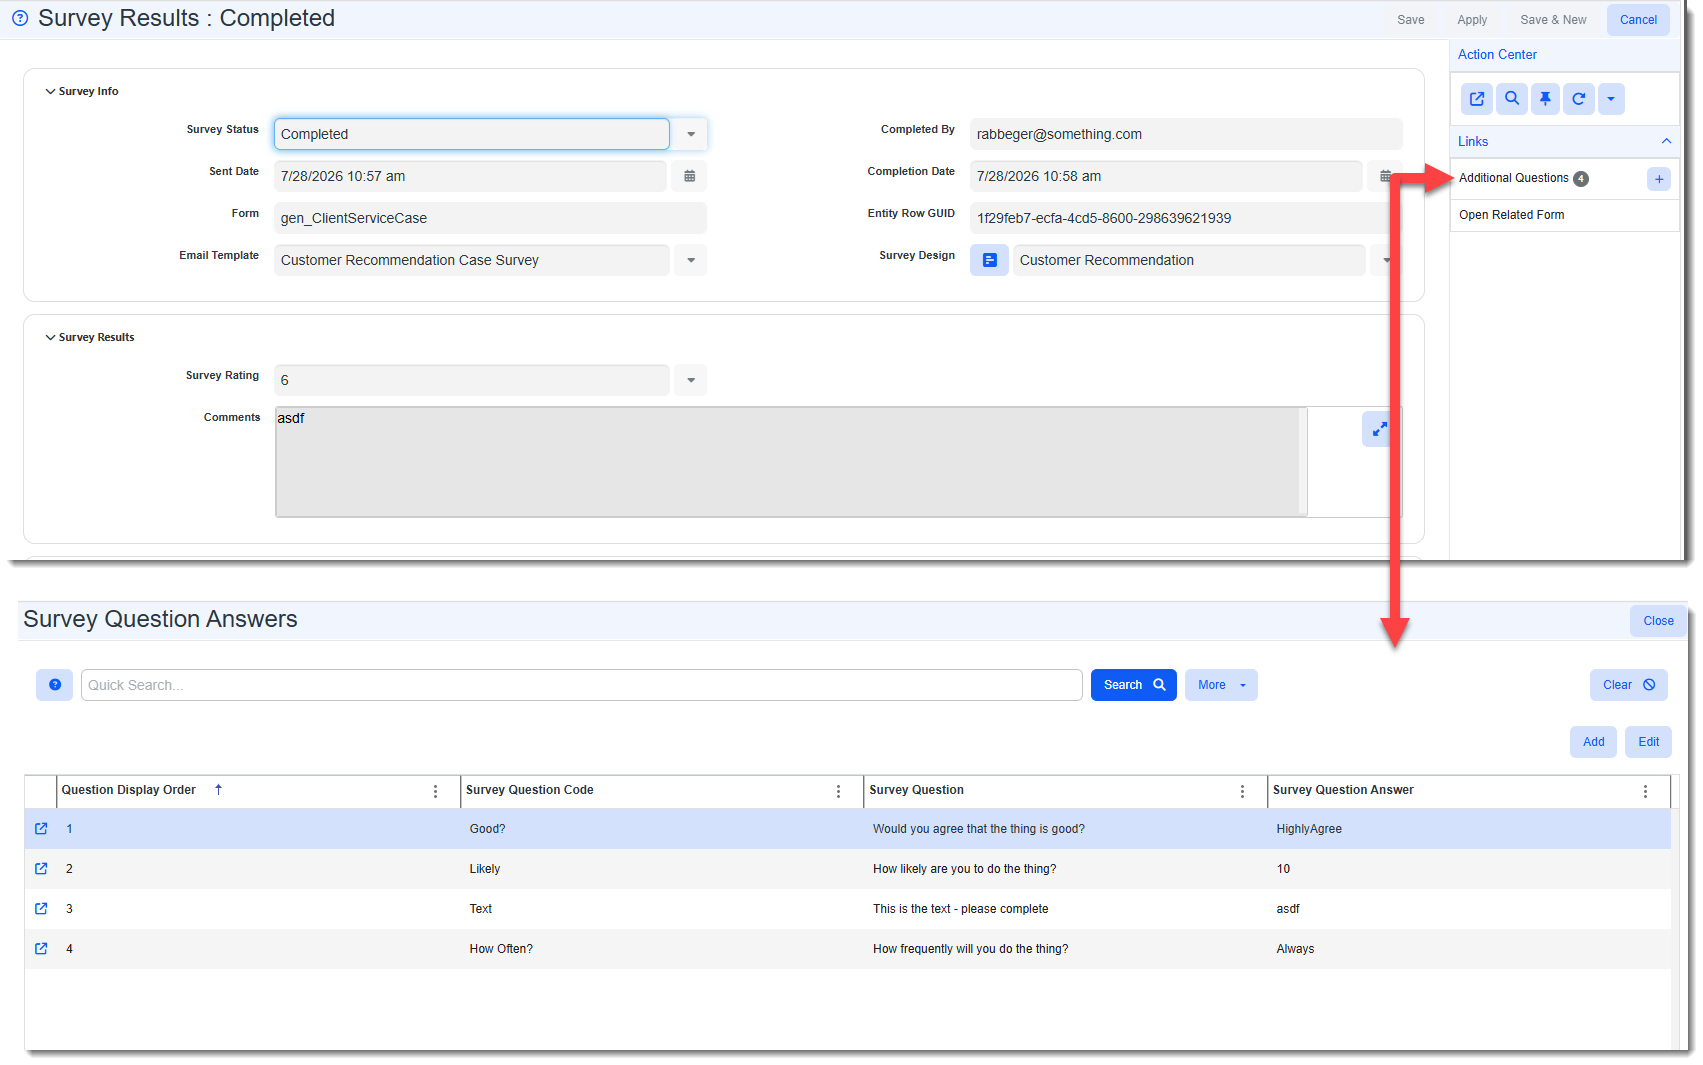
Opening a Survey Results dataform in Completed status also displays any Comments the respondent may have added.
-
Click Open Related Form in the Action Center to quickly access the related dataform to review any contributory data relating to an exceptionally high or low score without needing to generate a report.
You can use the work item links on the left pane that ClientSpace created for the related dataform and the survey results to toggle back and forth between the two forms.
Create Business Rules Using Survey Results
You can stamp values from the survey results into the form that triggered the form which can then be used to trigger additional workflows.
The following business rule methods are available for stamping values from survey results into the related form that triggered the survey:
-
SetSurveyResultFieldonTriggeringForm:
-
TableName: Must be set to Survey Results for the Method to be available.
-
TargetForm: Must be set to the related form where you want to stamp the value from the Survey Results.
Note: The system validates the related form (i.e., the form that triggered the survey) using the entity row GUID value to ensure that it is writing to the form that triggered the survey. If you enter the wrong form name in TargetForm, you will not receive an error, but no changes will be made.
-
TargetField: Must be a field on the related form. It will hold the value from the Survey Results table.
-
SourceField: The value on the Survey Results form that you want to copy to the TargetField on the related form.
-
-
SetAdditionalSurveyResultFieldonTriggeringForm:
-
TableName: Must be set to Survey Question Answers (which is used to hold results from the "Additional Questions" section of the survey design.
-
QuestionCodeValue: Identifies the specific question. Comes from the "Additional Questions" section of the Survey Design in the Question Code column.
Important: If you are creating a rule where the Primary Trigger Field or Secondary Trigger field is a question from the "Additional Questions" section of a Survey Design, also make sure that the Trigger Business Logic checkbox is checked for that question in the Survey Design. See the Creating a Survey Designsection of the Creating and Using Surveys on Email Templates topic for more details.
-
TargetForm: Must be set to the related form where you want to stamp the value from the Survey Question Answers.
Note: The system validates the related form (i.e., the form that triggered the survey) using the entity row GUID value to ensure that it is writing to the form that triggered the survey. If you enter the wrong form name in TargetForm, you will not receive an error, but no changes will be made.
- TargetField: Must be a field on the related form. It will hold the value from the Survey Question Answers table.
-
SourceField: The value on the Survey Question Answers form that you want to copy to the TargetField on the related form.
-
About the Unsubscribe Feature
Survey recipients can either unsubscribe from the current survey or from all surveys by clicking a link in the survey body which is automatically appended to the end of the survey email similar to the following:

When the link is clicked a "Manage Your Survey Preferences" window displays which allows a user to unsubscribe from the current survey or from all ClientSpace surveys:
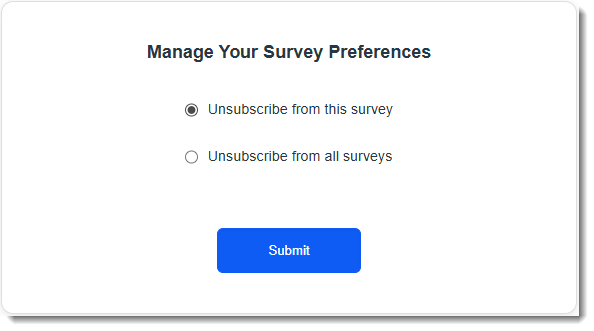
Unsubscribed users are tracked in two email recipient tables:
-
Unsubscribe by Design : This table stores "unsubscribe" details when users unsubscribe from a specific survey. The table name is tblSurveyUnsubscribeByDesign. The survey from which they are unsubscribing is listed in the table by the Survey Design value configured on the associated survey email template. Other details stored in the table include the recipient email, whether the recipient completed the survey, the last time the survey was sent to the recipient and "unsubscribe" status as Y.
-
Unsubscribe All: This table stores "unsubscribe" details when users unsubscribe from all surveys. The table name is tblSurveyUnsubscribeAll. It stores the "unsubscribe from all" status as Y, the recipient email and the date/time they unsubscribed.
You can manage survey recipient "Unsubscribe" statuses from the Master Survey Recipients Dashboard