Time Tracker Module Dashboard
The Time Tracker module dashboard displays a list of time tracking entries (i.e., time records). The Total Time (hours and minutes) of all displayed time tracking entries is shown at the top of the dashboard. If you filter the dashboard, the Total Time is updated to reflect the total amount of time tracked for the displayed entries only.
You can click Open ![]() next to a time tracking record to display the record in Edit mode. (Alternatively, click Edit or double-click a selected record.) You can perform edits such as manually adding time or you can open the associated work item (such as an Activity Details record, Task or dataform) to view the associate time tracking entries on the Time Tracking Action panel.
next to a time tracking record to display the record in Edit mode. (Alternatively, click Edit or double-click a selected record.) You can perform edits such as manually adding time or you can open the associated work item (such as an Activity Details record, Task or dataform) to view the associate time tracking entries on the Time Tracking Action panel.
![]()
Note: You can also add a Time Tracker entry from a dataform where the Time Tracker module has been enabled to display in the Action panel. See Adding and Managing Time Tracker Entries from a Dataform.
Accessing the Time Tracker Module Dashboard
To access the Time Tracker Module Dashboard:
-
If the Time Tracker module shortcut is displayed on the ClientSpace module bar, click it to open the dashboard
If the Time Tracker module shortcut is not displayed, on the right side of the module bar, click <username> > Modules. The Modules Search window opens. Click
 (Open) next to "Time Tracker" OR double-click the "Time Tracker" line item in the grid.
The Time Tracker module dashboard opens.
-
To search, you can do any of the following:
-
Sort by columns.
-
Use Quick Search to search by Category(starts with).
-
Use More search to search by User, Workspace, Organization, Record Type, Start Date (single date or range), or Category.
-
Adding a Time Tracking Record
As a Global Administrator, you can manually add a time tracking record. You have multiple options for manually adding time tracking records:
-
Add a completed time tracking record using "Calculate Minutes": Add the time tracking record with completed Start Date, Start Time, End Date, and End Time using the default Entry Method of "Calculate Minutes". The system calculates the time and adds it to the Time Tracking Action Center panel of the associated record as a completed time tracking entry and the black Total Time badge is updated to reflect cumulative time tracked:
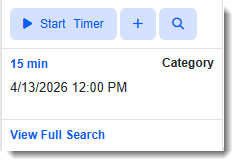
This is a way to add time to a work item when a user forgot to start a time tracking record and they have now completed work where time spent was not tracked. They can provide you with dates and approximate start and end times that you can input and allow the system to calculate the time spent.
-
Add an "open" (i.e., "in progress") time tracking record using "Calculate Minutes": Add the time tracking record with the Start Date and Start Time using the default Entry Method of "Calculate Minutes". Do not complete End Date, and End Time. The task is added to the associated record with the timer started. A user must click Stop in the Time Tracking Action Center panel of the associated record to stop tracking time.
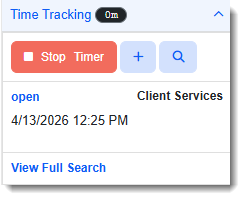
This is a way to capture time on a work item when a user forgot to start a time tracking record when they initially started work on "in progress" task, activity or other dataform. You can enter Start Date and Start Time to retroactively start the timer at the approximate time the work began. The system will use the Start Date and Start Time you entered along with the End Date and End Time recorded when the user clicks Stop to calculate the time spent.
Note: If you have an "in progress" time tracking record, the Time Tracker Stopwatch
 icon in the upper right corner of the ClientSpace menu bar changes from blue to red .
You can also manage time tracker entries from the Stopwatch list. For more details, see Time Tracker Stopwatch.
-
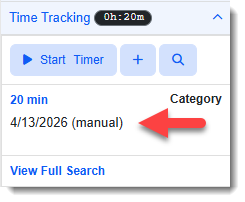
Add a completed time tracking method using "Manually Enter Time": This is similar to adding a completed time tracking entry using the "Calculate Minutes" Entry Method as it adds a completed time tracking entry and the black Total Time badge in the Action Center is updated to reflect cumulative time tracked.
However, when you select "Manually Enter Time" as the Entry Method, the Start Date is the only editable date/time field. The Minutes Spent field becomes available so that you can enter the approximate number of minutes a user spent working on an associated task, activity or other dataform.
This is a way to add time to a work item when a user forgot to start a time tracking record and completed work where time spent was not tracked but they cannot provide you with approximate start and end times that you can input to allow the system to calculate the time spent. They may only be able to provide a loose estimate of total time spent. For instance, if they spent about 1.5 hours, you can enter 90 minutes.
Note that when you use the "Manually Enter Time" Entry Method, the word "manual" displays in parentheses next to the entry in the Time Tracking Action Center panel of the associated record as shown in the example below:
To add a time tracking record from the Time Tracker Dashboard:
| 1. | Click Add. |
The Add Time Record form opens.
![]()
| 2. | Complete the applicable form fields: |
|
Entry Method |
Accept the default setting of "Calculate Minutes" to allow the system to calculate time based on the Start Date, Start Time, End Date, and End Time. OR Select "Manually Enter Time" to display the Minutes Spent field and then manually enter the time spent in minutes. |
|
User |
Defaults as your user name. |
| Minutes Spent | If you select "Manually Enter Time" as the Entry Method,Minutes Spent becomes available. You can manually add the estimated time spent to create a completed time tracking record. |
| Start Date | Required. Defaults as the current date. Edit if applicable. |
| Start Time |
Required. Defaults as the current time. Edit if applicable. Note: This field is "read only" for Entry Method = Manually Enter Time. It defaults as the current time and cannot be edited. |
| End Date |
If entering a completed time entry record for Entry Method = Calculate Minutes: Enter an End Date. OR If entering an "in progress" time entry record for Entry Method = Calculate Minutes: Leave this field blank . The system will calculate End Date and End Time when a user clicks Stop Timer in the Time Tracking Action Center panel of the associated record to stop tracking time. Note: This field is "read only" for Entry Method = Manually Enter Time. |
| End Time |
If entering a completed task for Entry Method = Calculate Minutes: Enter an End Time. OR If entering an "in progress" time entry record for Entry Method = Calculate Minutes: Leave this field blank . The system will calculate End Date and End Time when a user clicks Stop Timer in the Time Tracking Action Center panel of the associated record to stop tracking time. Note: This field is "read only" for Entry Method = Manually Enter Time. |
|
Category |
Required. Select the Time Tracker category. Values vary depending on your configuration. Time categories may be defaulted using configuration to set the defaults. See Using Time Tracking Categories. |
|
Workspace |
Required. Select the associated workspace. |
|
Organization |
The Organization typically defaults based on the selected Workspace. If the value does not default, you can manually select the Organization associated with the Workspace from the drop-down list. |
|
Record Type |
Required. Select a record type such as Activity, Task or a dataform where Time Tracking is enabled. |
|
Record |
The Record is where the time tracking record will be created. The selections you made in the Workspace, Organization, and Record Type fields causes the Record field list values to filter to valid options only. For example, if you select a Record Type of Task within a selected Workspace and Organization, this list is filtered to display only a list of Active tasks within that workspace and organization. You can then select a valid task to which you will add the time tracking record. |
|
Billable |
Users with appropriate access to the TimeTracker.Billable security entity can flag Time Tracker entries that should be billed by checking the Billable checkbox. Security entity access options must be assigned by a Global Administrator and are as follows:
|
|
Notes |
Optionally, add notes about the time tracking record. |
| 3. | Click Apply. |
A link to Activity, Task or dataform where you added the time tracking record is added to the Links panel. You can click the link to to jump to the associated ClientSpace record for this time tracker entry.
![]()
Editing a Time Tracking Record
To edit a time tracking record:
-
Select the time tracking record in the Time Tracker Dashboard and click Edit.
The record opens in edit mode. -
Make the desired changes and then click Save or Apply.
Deleting a Time Tracking Record
To delete a time tracking record:
-
Select the time tracking record in the Time Tracker Dashboard and click Delete.
A confirmation message displays. -
To proceed with deleting the record, click Yes on the confirmation message.